Sunday, September 25, 2011

A Reflection

I have been meaning to post on the retreat since getting back but, with the bad ankle and jumping back into teaching, I put it off.  I have been reflecting on the hustle and bustle of life and really thinking about the change in my relationship with food over the years.  Dear Chef was able to join me on the last day at the retreat and he was as moved by the mindful eating at the retreat as I was, particularly the Five Mindfulnesses of Eating.

At each meal one person would read or quote this reminder before we ate our food.  It brought both a sense of gratitude and an awake presence during the meal.  We thought it would be an excellent family food prayer.  My relationship with food before becoming a vegetarian was decidedly love-hate (heavy on the hate).  Vegetarianism was a cornerstone to shifting my perception, as was sustainable cooking, but mindful eating has completely changed the dynamic.  I love the food in our home.  I love the beauty of the food.  I love the flavor of the food.  Most of all I love that the food is not my enemy.

We took time to enjoy the farmer's market in San Francisco before we came the rest of the way home from retreat.  Chef (who is also a gifted photographer) took some terrific photos of our time at the market. I hope you enjoy the riot of color and the peace of the prayer.


Mindful eating prayer:
  • This food is a gift of the earth, the sky, numerous living beings and much hard work.
  • May we eat with mindfulness and gratitude so as to be worthy to receive it.
  • May we recognize and transform our unwholesome mental formations, especially our greed, and learn to eat with moderation.
  • May we keep our compassion alive by eating in such a way that we reduce the suffering of living beings, preserve our planet and reverse the process of global warming.
  • We accept this food so that we may nurture our brotherhood and sisterhood, strengthen our sangha and nourish our ideal of serving all beings.





Thursday, September 22, 2011

A Simple Practice


This post was written for inclusion in the Mindful Mama Blog Carnival hosted by hosted by Kelly of Becoming Crunchy and Zoie of TouchstoneZ. Participants are writing posts about what mindfulness mean to them. Please read to the end to find a list of links to the other carnival participants.
***

Mindfulness is a keystone in our home and we would not enjoy the chaos of our lives nearly as much without it.  When Chef and I first started our practice we already had the full midget crew, so including them was the Way from day one.  We did struggle at first to figure out what worked for us.  We now have a simple practice that brings us a very connected peaceful (you know, usually...) family.

Several friends with kids have asked us how we practice with kids and I always start by saying you have to adjust your expectations.  Practicing with kids is great, it's wonderful, but it's also nothing like practicing at a meditation center with nothing but adults in the room, nor is it anything like practicing alone.

We have a two part practice.  In the evening we gather together in our bedroom on our big bed.  Three across the top and three along the bottom.  It provides a nice soft spot and we are in a good circle (we also have a small house so it's a great dedicated space).  One of the kids gets to help light incense or the oil burner on the dresser.  We read a story together.  Sometimes its a bible story, sometimes its a dharma story and sometimes it's a favorite kid story.  We always adjust the seriousness and length based on how wiggly and giggly the crew is.  Some nights we get great in depth reading and others - it's short story time.  :) We often have a short discussion after the story.  The thoughts the midgets express during this discussion are usually more thoughtful than expected and as they have gotten confidence that their thoughts will be valued no matter what they say, the depth of their observations has just grown.

After story time we do short deep breathing meditation.  We either ring our bell three times or one of us plays the singing bowl for a brief time at the end to break meditation.  We then take time going around the circle to give deep heart hugs to each other.

Heart hugs are the center of our practice.  That simple step has brought us more connection, more peace than any other thing we have ever done, we crave it at the end of our day.  And it is SO very simple.  You hug to the 'other' side so that your hearts are lined up over one another.  You take a nice deep breath in the hug, really feeling that connection and time of the hug.  Take another deep breath and express your love to one another and release.

I know it does not sound like a lot but it really has changed our home.

In the morning we do a short Tai Chi practice (we rarely hit 30 min) as a family and kneel in meditative prayer together; sometimes one of the kids has something they want to say and they take turns leading.  As the kids leave for their busses we do a super short hug out the door.

Once a month we do a special meditation practice called 'Watering the Seeds'.  As needed we will do 'Deep Listening' practice to work out disputes or hurt feelings.  That's it.  The depth of our practice is probably hard to see from this simple description but that is the beauty of mindfulness.  Mindfulness grows from such simple roots when the space and time are provided.
I hope this helps give you the inspiration to add a bit of Mindfulness to your home.


***
Mindful Mama Blog CarnivalVisit the Mindful Mama Blog Carnival Homepage to find out how you can participate in the next Mindful Mama Blog Carnival!
Please take time to read the submissions by the other carnival participants:

Sunday, September 4, 2011

Roast no-Beast


I have been promising to post this particularly long recipe for a while.  It is not hard but I do not make it very often because it takes five hours start to finish.  Now, four of those hours are completely inactive, but I know that kind of commitment to food just is not possible for most of us.  

That being said, this is so worth it and I do not buy store bought sandwich slices anymore.  This started out as Sham (replaces ham slices) and was developed into Roast no-Beast (replacing roast beef), and now it is sometimes Fakey (you guessed it, turkey) and Shicken (umm, I have kids don't judge the names, chicken).  This blog will be on the no-Beast variation but I will get the variations up when I get back from retreat -- so you guys will look forward to my return.  :)

I am a visual learner and this recipe has a lot of steps so I hope you like the pictures - so many pictures - included in this post.  

Ingredients:   
ground almonds - 5 tablespoons
smoked tofu - 7 ounces 
         (I have only been able to find this at Winco and the package is 7.14 ounces and I throw it all in)
No Beef base Bullion - 1 tablespoon
Soy sauce - 1 tablespoon
Kitchen Bouquet - 1 tablespoon
Liquid Smoke - 1 tablespoon
Tomato paste - 1 tablespoon
Ketchup - 1 tablespoon
Vegetable oil 3 tablespoons
Finely chopped onion - 1/4 cup
Brown sugar - 2 tablespoons
Nutritional yeast - 1 tablespoon
Minced garlic - 1 teaspoon
Black pepper - 3/4 teaspoon
Salt - 1/2 teaspoon
Vital wheat gluten - 1 cup plus 3 tablespoons
Red wine of your choice - at least 1 cup for deglazing with.
                                                                                                       

If you’re starting with whole almonds, grind them in the food processor first and set aside.


Crumble the tofu into the blender. 
Put the bouillon in a glass measuring cup and add a couple tablespoons of very hot water to activate. Then add the soy sauce, Kitchen bouquet, liquid smoke, tomato paste, and ketchup to the measuring cup.  Top up to the 150 ml measure line on the glass with either your red wine of choice or water (this should only be a tablespoon or two total added liquid).

Add remaining ingredients to blender EXCEPT gluten and reserved wine. This means you are filling the blender with the veggie oil, onion, sugar, nooge, garlic, pepper and salt. :)  

Add this liquid mess to the blender, scraping out the glass with a rubber spatula if needed.

Blenderize until completely smooth. You now have the beginnings of a 'meat' shake.  :)
Empty into a large mixing bowl with the vital wheat gluten.

Stir the gluten and 'meat' shake together with your hands until evenly combined.
 
 You’ll have a soft dough. Do not over mix or knead the dough, I know it doesn't look like much now but with the magic of steam this will be your sandwich slices. 
Turn out onto a large sheet of plastic wrap and form into a log.


Wrap it up tight by rolling it down the sheet.  I do this twice, once the fat way and once the skinny way.


Then wrap it again in two to three layers of aluminium foil being careful to keep the seams from lining up. Essentially you want to keep all the magic steam from actually getting into your soon to be yummy sandwich filling. 

I mark the fat sides 1-4 with a sharpie to make the next step easier.
Bring water to boil in a pot that has a steamer insert. Steam for two hours over gently simmering water, turning roll a quarter turn every half hour (I start with the 1 facing up and keep track of turns by the numbers). 


Place in the steamer (don't be confused by the double loaf, I made two but these instructions are for a SINGLE loaf).
Check water level regularly to ensure the pot does not boil dry and add hot water as necessary.  Remember to turn the loaf every 30 minutes.  Turn heat off and let sit in the steamer to rest for two hours. 


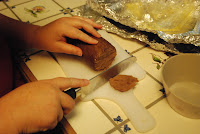
  Carefully unwrap and slice. 


Voila!  You have sandwich slices.  These are ready to go as is, and with all the other variations you stop here, but for me, the roast needs a final step.

Take your slices and julianne them.

Get olive oil heating in a cast iron skillet (the cast iron really does give the best flavor results). 


Add the roast strips to the hot oil in the pan and sauté briefly.
Splash in some of that red wine to deglaze.


 Remove from heat after letting it saute just a bit more.
That gristly goodness you just created is now ready for some dense, nutty wheat bread and mustard, served with the cold beverage of your choice.  I recommend a cold cider myself.   

This recipe makes a large loaf about 1 to 1 1/2 pounds.  It keeps well in a sealed plastic container in the fridge for two weeks or so.  

Sunday, August 28, 2011

Wheat Thins at home

I didn't take pictures because I wasn't sure if this time I had it right.  I did!  But they were all gone before photos could happen.  When I get another batch made I will add a photo.  There is a version of this recipe out there on the web and I adapted from it.  These taste just like the big box version without all the fat and considerably less sodium (but seriously, don't skimp on the salt on top before they go in the oven unless you are a fan of sadness).  

*1 1/4 cups whole wheat flour
*1 1/2 tablespoons sugar
*1/2 teaspoon salt
*1/4 teaspoon paprika
*4 tablespoons earth balance
*1/2 cup plant milk
*1/4 teaspoon vanilla
*Additional salt for topping

1. Combine the flour, sugar, salt and paprika in a medium bowl. Cut the butter into small pieces and mix it in thoroughly with your mixer, (think pebbles).  Combine the milk and vanilla (I know, but trust me), and add to the flour mixture, mixing until well combined.  Gather into a dough ball by hand at this point.

2. Preheat the oven to 400 degrees F. Line baking sheets with parchment paper or silpat mats.

3. Using a pasta roller on the widest setting, slowly turn the dough through.  If you move too fast it will *not* go through in a big piece.  Take the sheets through again on the next smallest setting.  On my machine the first time through is set to 1, the second time is set to 2. Either leave 'rustic' or cut with a rolling blade (pizza or pasta cutter).  If you are hand rolling, work them as thin as you possibly can, avoid using flour during roll out as much as you can.  

4. Transfer the sheets to the baking sheets; you can crowd them together -- they don’t expand while baking. Sprinkle the sheets with salt. Repeat with the remaining pieces of dough. Save the scraps under plastic wrap and re-roll.

5. Bake the crackers until crisp and browned, 5 to 7 minutes. If some of the crackers brown too quickly, remove them and return the remaining crackers to the oven to finish baking. These crackers bake quickly, so watch them closely! Remove the crackers from the oven and cool on a rack; they cool quickly.  Store in airtight containers, assuming they last that long.  :)

Saturday, August 27, 2011

Crackers for crackers!

Cooling on the rack after a quick 15 min in the oven.  :)
We are testing four awesome cracker recipes this weekend.  None of these are mine but they are AWESOME!

First off is from 500 Vegan Recipes -- my favorite cookbook of all time!

Go to page 97 for this delectable cracker recipe!  It takes two minutes in the mixer and moments with the pasta roller to get perfect cracker dough.  We then just cut them with our little pasta cutter.  They aren't the dark orange you get from a box but they pack all the cheesy flavor of those pre-made store bought crackers.  I promise.

1 C Flour, 1/3 C Nooge, 1 tsp salt, 1/2 tsp pepper and 4 Tbs earth balance. 

After you add the 1/4 C soy milk just gather into a dense ball

I rolled this first batch by hand; second batch PASTA ROLLER!

Crackers after cutting with adorable animal cutters by the proud assistant.